Sometimes you might want to create your own admin page in WordPress where you can manage settings that are not WordPress default. Let’s say you want to create a Poll plugin for your blogs and you need to have an admin section where the WordPress administrators can create polls.
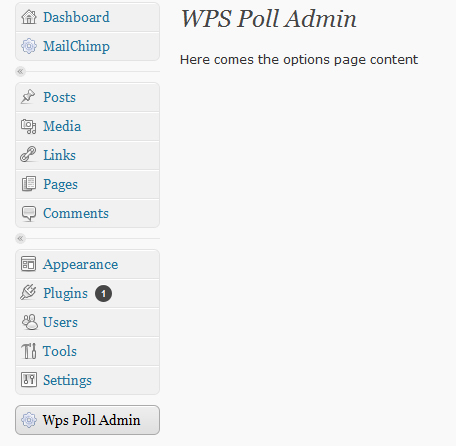
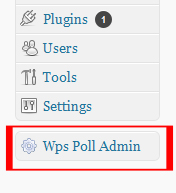
Note: this tutorial does not go through the details of creating the poll admin, it’s just about creating a new admin page where you could later add the poll admin interface. This tutorial will show you how to create a new entry to the WordPress admin menu, just like in the screenshot below:
Creating a new WordPress plugin
First things first, you need to create a new WordPress plugin file. This is easier than it sounds. Create a new folder inside wp_content/plugins and add an empty php file inside. Let’s create a folder Wps-poll and a file wps-poll.php. Now, let’s edit the wps-poll.php file and transform it into a plugin file. You need to add inside the <?php ?> tags at least the following:
/*  Plugin Name: Wps Poll (the name of your plugin)
  Plugin URI: https://URI_Of_Page_Describing_Plugin_and_Updates
  Description: This plugin helps you create simple polls in WordPress  - The plugin description that appears in the Plugins activation page
  Version: 0.1 (the current version of the plugin)
	Author: Your name
	Author URI: https://URI_Of_The_Plugin_Author
	License: GPL2  - most WordPress plugins are released under GPL2 license terms
*/
Save the file and let’s go to the plugins activation page in WordPress. Here is how the new plugin should look like: 
Create the Options page content
Right now, the plugin doesn’t do anything else than showing in the WordPress plugins lists. Let’s create the options page content (as I’m not describing the poll administration, I’ll just have some dummy content).
Open the plugin file you have created earlier and let’s add a function to generate the content (add it just below the previous */ we added previously:
 function wps_poll_options_page () { ?>

 <div class="wrap"> <h2>WPS Poll Admin</h2> <p>Here comes the options page content</p> </div>

<? php }
Let me explain: “wps_poll_options_page” is the name of the new function I’m creating (you can name it anyway you want). Then I’m closing the PHP section, add the HTML code of the page, then close the } inside a new PHP section. class=”wrap” is a standard WordPress class which you can use to create new admin pages (but of course you can create your own classes).
Create the new admin entry in the WordPress admin menu
Next step is to create a new menu entry for the new page. You can create the new menu inside the existing WordPress menus, for example inside the Settings menu, or inside the Users menu, but for this tutorial we are going to create a completely separate menu entry – it’s easier to locate and you can have submenus as well if you need more pages).
To create a new menu entry, you need to create a new function that ads the menu:
function wps_poll_menu () {

add_menu_page('Wps Admin','Wps Poll Admin','manage_options',wps_poll_admin', wps_poll_options_page);

 }
As before, wps_poll_menu is the name of the function, and you can use any name. “add_menu_page” is a WordPress specific function that creates a new top level menu section in the admin menu sidebar and registers a hook that is going to lshow your new page. add_menu_page accepts a number of parameters:
- $page_title – the HTMLtitle tag of the new page (that appears between the <head> tags in HTML
- $menu_title – the name that is going to appear in the menu
- $capability – who is going to have the right to access the page, in my case, if you have the right to manage options you will have the right to access this page
- $menu_slug – should be unique and will be part of the URL as a parameter, for example admin.php?page=wps_poll_admin
- $function – the function that is called to create the page, in our case:
- $icon_url – it’s optional and it ads an icon to the menu, to the left of the menu name
- $position – optional as well, helps position the new menu among the standard menu entries.
Adding the action that will enable the functions
If you read about the WordPress hooks and actions, then you should already know that the functions we have just created are not executed unless we add an action that calls the wps_polls_menu function. It’s very easy. Below the last function, add the following code:
add_action('admin_menu','wps_poll_menu');
“admin_menu” is the name of the hook where our function will be added and “wps_poll_menu” is the function name. To explain, WordPress listens to various hooks, and you can add some functions to execute when the hook is reached. Easy. Here is the entire code:
<?php

/* Plugin Name: Wps Poll Plugin URI: https://www.wp-starter.com

Description: This plugin helps you create simple Polls in WordPress

Version: 0.1

Author: Cristian Dorobantescu

Author URI: https://www.wp-starter.com

License: GPL2 */

function wps_poll_options_page () { ?>

<div class="wrap"> <h2>WPS Poll Admin</h2> <p>Here comes the options page content</p> </div>

<?php }

function wps_poll_menu () {

add_menu_page('html title','Wps Poll Admin','manage_options','wps_poll_admin', wps_poll_options_page); }

add_action('admin_menu','wps_poll_menu'); ?>
Activating the plugin
Where done coding, all you need to do now is to activate the plugin in the plugins page. Go to Plugins and locate the new plugin. Click on “activate” and tada! 


